IOT
Jump to navigation
Jump to search
Composant
Server
MQTT server
Mosquitto
[Mosquitto ]
Manage Users
- Create Password File
mosquitto_passwd -c /etc/mosquitto/passwd <user_name>
- Add a new user
mosquitto_passwd -b passwordfile user password
- Update configuration file to use the password file
Vernemq
[VerneMq ]
Manage Users
- Create or replace password file
vmq-passwd -c /etc/vernemq/vmq.passwd username
- Add a user to an existing password file
vmq-passwd -a /etc/vernemq/vmq.passwd username
- Delete User
vmq-passwd -D /etc/vernemq/vmq.passwd username
Show plugins
Show plugins vmq-admin plugin show
Enable Plugin vmq-admin plugin enable --name=vmq_acl
Disable a plugin vmq-admin plugin disable --name=vmq_acl
Blynk
[Blynk ]
Access
- Your Admin url is https://yourserver:9443/admin
- Your Admin login email is admin@blynk.cc
- Your Admin password is admin
Hardware
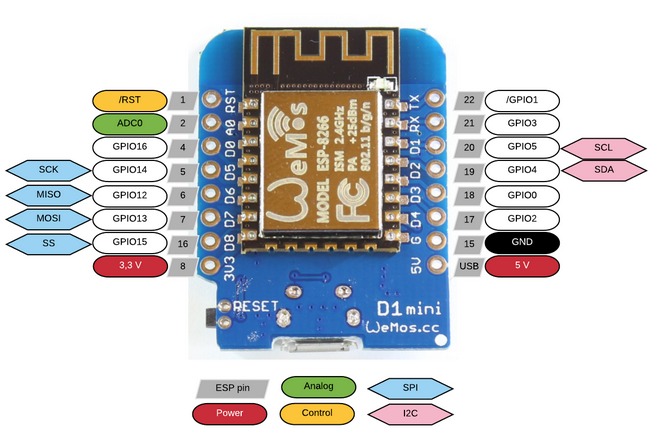
ESP8266
[NodeMCU Lua ESP8266 ESP-12 WeMos D1 Mini WIFI 4M Bytes Development Board Module]

Mode GPIO0 GPIO2 GPIO15
- Flash (démarrage normal: exécution du programme installé en Flash) 3.3v 3.3v GND
- UART (upload à partir de la liaison série) GND 3.3v GND
- SDIO (démarrage à partir d'une carde SD) peu importe peu importe 3.3v
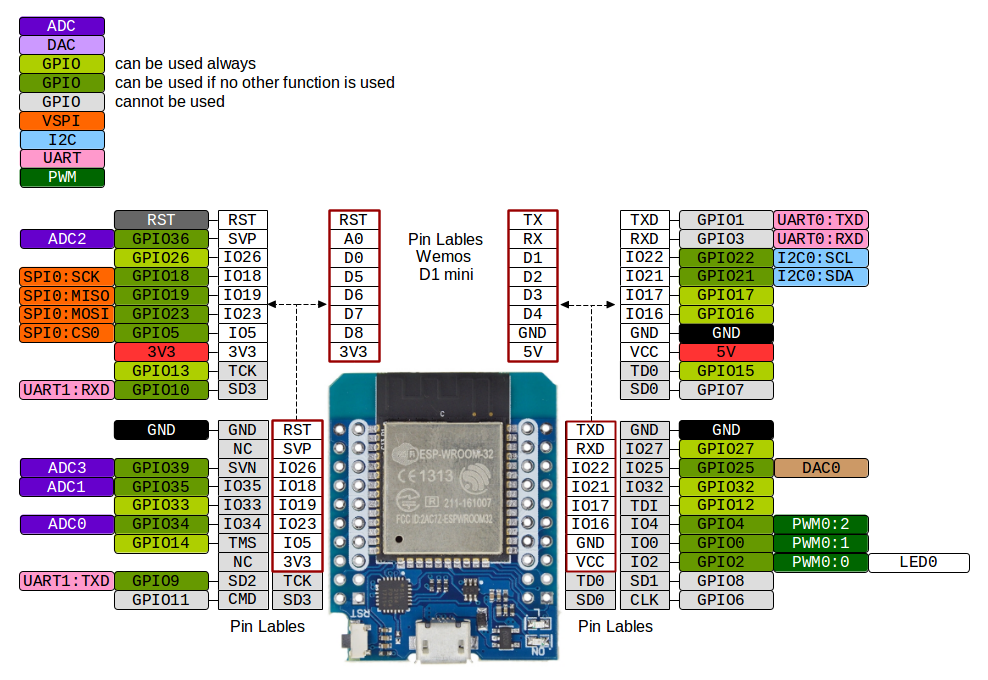
ESP32
ESP32 D1 mini

File:Esp32-wroom-32 datasheet.pdf
ESP32 Dev Nodemcu

IDE Arduino
Configuration
General
- File -> Preferences -> Additional Boards Manager URLs :
- Tools -> Boards -> Boards Manager:
- Search for ESP8266
- Install Esp8266 by Esp8266 Community
NodeMCU Lua ESP8266 ESP-12 WeMos D1 Mini WIFI 4M Bytes
- Tools -> Boards -> "WeMos D1 R2 & Mini"
- CPU Frequency 80 Mhz
- Upload Speed -> 115200
Adafruit HUZZAH ESP8266 breakout
- Tools -> Boards -> "ESP32 Dev Module"
- CPU Frequency 80 Mhz
- Upload Speed -> 115200
HiGrow
- Tools -> Boards -> "Adafruit HUZZAH ESP8266"
- CPU Frequency 80 Mhz
- Upload Speed -> 921600
- Flasj Mode - DIO
Huzzah Reset
- Hold down the GPIO0 button, the red LED will be lit
- While holding down GPIO0, click the RESET button
- Release RESET, then release GPIO0
- When you release the RESET button, the red LED will be lit dimly, this means it's ready to bootload
Lolin NodeMcu v3
- Tools -> Boards -> "NodeMcu 1.0 (ESP-12E" Module)
- CPU Frequency 80 Mhz
- Upload Speed -> 115200
ESP23 MCU 2.8 Inch Smart Display
- If the port is not visible and get "usbfs: interface 0 claimed by ch341 while 'brltty' sets config #1"
- Identify the vendor with lsusb -> Bus 001 Device 017: ID 1a86:7523 QinHeng Electronics CH340 serial converter
- Disable the rule in /usr/lib/udev/rules.d/85-brltty.rules
# Device: 1A86:7523
# Baum [NLS eReader Zoomax (20 cells)]
###Nr001 ENV{PRODUCT}=="1a86/7523/*", ENV{BRLTTY_BRAILLE_DRIVER}="bm", GOTO="brltty_usb_run"
- Reboot
- Board URL (in the preference) [1]
- Tools -> Boards -> "ESP32 Dev Module"
- CPU Frequency: 240 Mhz (Wifi/BT)
- Flash Mode: "DIO"
- Flash Size: "4MB (32Mb)"
Arduino Runs On: "Core 1" Events Run On: "Core 1" Programmer: "Esptool"
- Upload Speed -> 115200
Wio Terminal
- Get Started
- Library to load: sketch -> Include Library -> Add .ZIP Library
- Seeed_Arduino_atWiFi
- Seeed_Arduino_FreeRTOS
- Seeed_Arduino_atUnified
- esp-at-lib esp-at-lib esp-at-lib
- Seeed_Arduino_mbedtls
- Seeed_Arduino_atWiFiClientSecure.git
- Additional Board: File > Preferences -> Additional Boards Manager URLs:
- package_seeeduino_boards_index.json
- Install additional boards: Tools > Board > Board Manager and Search Wio Terminal in the Boards Manager
- Setup
- Tools -> Boards -> Seeeduino Wio Terminal
- Cpu Frequency -> 120 Mhz
- Upload Speed ->
ESPHome
ESPHome Installation
Docker option Dashboard
- Get Docker Image
docker pull ghcr.io/esphome/esphome
- Create a container and share port 6052
Docker option command line
- Create a project
docker run --rm -v "${PWD}":/config -it ghcr.io/esphome/esphome wizard livingroom.yaml
Local ESPHome Installation
- Validate Python istallation
python3 -m venv venv
- Create pythin virtual environement
source venv/bin/activate
- Install ESPHome
pip3 install esphome
- Validate ESPHome istallation
esphome version
Upload ESPHome Bin
ESPHome Commande Line
esphome run configfile.yaml
ESPHome Dashboard
- Connect to ESPHome docker port 6052 hppt://localhost:6052 with Chrome !
- Install from web using Plug into this computer
TroubleShooting
sync
- Try to load a new project