Home-Assistant: Difference between revisions
Jump to navigation
Jump to search
| (12 intermediate revisions by the same user not shown) | |||
| Line 18: | Line 18: | ||
==Configuration== | ==Configuration== | ||
=== Roomba === | |||
# Install dorita980 or inside a container | |||
<pre> | |||
npm install -g dorita980 | |||
get-roomba-password-cloud myemail mypassword | |||
</pre> | |||
<PRE> | |||
docker run -it node sh -c "npm install -g dorita980 && get-roomba-password-cloud <iRobot Username> <iRobot Password> [Optional API-Key]" | |||
</PRE> | |||
=== Tuya Integration === | === Tuya Integration === | ||
| Line 45: | Line 58: | ||
[https://github.com/rospogrigio/localtuya/ Local Tuya] | [https://github.com/rospogrigio/localtuya/ Local Tuya] | ||
==== Install HACS | ==== Install Get HACS Community Store ==== | ||
===== With command line, Without addons ===== | |||
[https://github.com/hacs/ HACS] | [https://github.com/hacs/ HACS] | ||
| Line 54: | Line 68: | ||
* Restart docker host (under development) | * Restart docker host (under development) | ||
===== With Addon ===== | |||
Click on "my link" for downloading Hacs installer and execute it | |||
* HACS page link: [https://hacs.xyz/docs/use/download/download/#to-download-hacs | my Link] | |||
==== Install Local Tuya ==== | |||
[[File:LocalTuya Install from HACS.png]] | |||
==== Configure Local Tuya ==== | |||
* Add the new integration Settings, then Devices & Services | * Add the new integration Settings, then Devices & Services | ||
[[File:Cloud API Account Configuration.png | API Configuration]] | |||
==== Add new device ==== | |||
===== Get Device List with key ===== | |||
* Install codetheweb/tuyapi | * Install codetheweb/tuyapi | ||
[https://github.com/codetheweb/tuyapi tuyapi] | [https://github.com/codetheweb/tuyapi tuyapi] | ||
* install Tuya CLI | |||
<pre>sudo npm i @tuyapi/cli -g</pre> | |||
* execute the following command to get the list of all device | * execute the following command to get the list of all device | ||
<pre>tuya-cli wizard</pre> | <pre>tuya-cli wizard</pre> | ||
==== | ===== Configuration by type of device ===== | ||
Globe: Bulbs model 35804 (from Costco) | Globe: Bulbs model 35804 (from Costco) | ||
<pre> | <pre> | ||
- host: 192.168.1.168 | - host: 192.168.1.168 | ||
device_id: aaabbbccc_dummy | device_id: aaabbbccc_dummy | ||
| Line 97: | Line 136: | ||
Led Strip (from Costco) | Led Strip (from Costco) | ||
<pre> | <pre> | ||
- host: 192.168.1.168 | - host: 192.168.1.168 | ||
device_id: aaabbbccc_dummy | device_id: aaabbbccc_dummy | ||
| Line 107: | Line 145: | ||
friendly_name: tuya_led_on_off | friendly_name: tuya_led_on_off | ||
id: 20 | id: 20 | ||
brightness: | brightness: 26 | ||
color_temp: "none" | color_temp: "none" | ||
color_mode: 21 | color_mode: 21 | ||
| Line 114: | Line 152: | ||
color_temp_max_kelvin: 5000 | color_temp_max_kelvin: 5000 | ||
</pre> | </pre> | ||
=== Alexa Integration === | === Alexa Integration === | ||
Latest revision as of 04:06, 25 November 2024
Home Page / Link
Main Page: [home-assistant.io]
Install with docker
- Get source from Linuxserver and build (docker build)
Linux Server homeassistant
- Install HACS to get community app
HACS Instruction: HACS Prerequisites
- run a script under login directory on home assistant server
- Add HACS as a new integration
- Install localTuya with HACS and configure Tuya device localy
Configuration
Roomba
- Install dorita980 or inside a container
npm install -g dorita980
get-roomba-password-cloud myemail mypassword
docker run -it node sh -c "npm install -g dorita980 && get-roomba-password-cloud <iRobot Username> <iRobot Password> [Optional API-Key]"
Tuya Integration
- Create a could project at iot.tuya.com
- Country
- Choose the country you picked when signing up.
- Tuya IoT Access ID :
- Go to your cloud project on Tuya IoT Platform.
- Find the Access ID under Authorization Key on the Project Overview tab.
- Tuya IoT Access Secret
- Go to your cloud project on Tuya IoT Platform.
- Find the Access Secret under Authorization Key on the Project Overview tab.
- Do not setup API Account
- Click / Select .Do not configure a Cloud API account
- Account
- Tuya Smart or Smart Life app account Password. The password of your app account.
LocalTuya
Install Get HACS Community Store
With command line, Without addons
- Enable Advanced Mode under the account option
- Execute bellow command inside the container
wget -O - https://get.hacs.xyz | bash -
- Restart docker host (under development)
With Addon
Click on "my link" for downloading Hacs installer and execute it
- HACS page link: | my Link
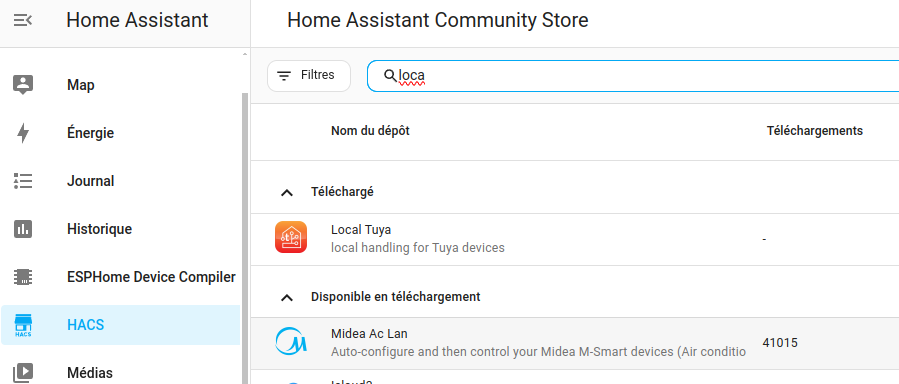
Install Local Tuya
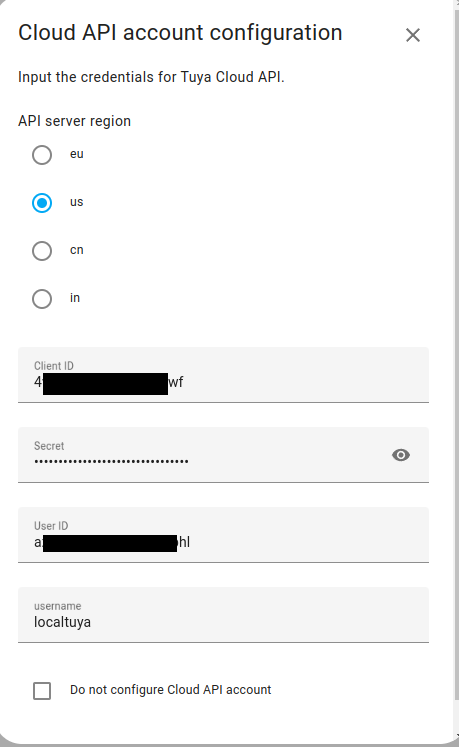
Configure Local Tuya
- Add the new integration Settings, then Devices & Services
Add new device
Get Device List with key
- Install codetheweb/tuyapi
- install Tuya CLI
sudo npm i @tuyapi/cli -g
- execute the following command to get the list of all device
tuya-cli wizard
Configuration by type of device
Globe: Bulbs model 35804 (from Costco)
- host: 192.168.1.168
  device_id: aaabbbccc_dummy
  local_key: ddddeeefff_dummy
  friendly_name: Tuya_Ampoule_1
  protocol_version: "3.3"
  entities:
    - platform: light
      friendly_name: tuya_ampoule1_on_off
      id: 20
      color_mode: 21 # Optional, usually 2 or 21, default: "none"
      brightness: 22 # Optional, usually 3 or 22, default: "none"
      color_temp: 23 # Optional, usually 4 or 23, default: "none"
      color_temp_min_kelvin: 2000
      color_temp_max_kelvin: 5000
      color: 24
Smart Plug 50329 (from Costco)
- host: 192.168.1.240
  device_id: bedded_dummy
  local_key: q1w2e3r4_dummy
  friendly_name: Tuya_Prise_1
  protocol_version: "3.3"
  entities:
    - platform: switch
      friendly_name: tuya_prise1_on_off
      id: 1
Led Strip (from Costco)
- host: 192.168.1.168
  device_id: aaabbbccc_dummy
  local_key: ddddeeefff_dummy
  friendly_name: Tuya_Led_1
  protocol_version: "3.3"
  entities:
    - platform: light
      friendly_name: tuya_led_on_off
      id: 20
      brightness: 26
      color_temp: "none"
      color_mode: 21
      color: 24
      color_temp_min_kelvin: 2000
      color_temp_max_kelvin: 5000
Alexa Integration
- Create a skill
- Run the skill

